
In January, my buddies Grace and Leila had their birthday. I decided to make them something instead of buying them something. Since at the time I was going through my major embroidery obsession, I decided to embroider monograms for them.

I posted the DIY for Graces monogram and today I am posting Leila’s.
Hope you enjoy this DIY.

Supplies: 4″ wooden hoop, embroidering linen, embroidery floss, fabric market, needle, pair of scissors, monogram template, felt circle to cover the back of the monogram (not shown)

To attach the fabric to the hoop: Loosen the screw or nut on the outer embroidery hoop and separate the inner and outer rings. The outer ring will hold the fabric over the inner ring once you have inserted the fabric.

Next, place the inner ring on a flat surface. Place your fabric over it, then put the outer ring over the fabric and press until the bottom ring is snug inside the outer ring.
Finally, tighten the nut or screw securely. To make things a little easier for me, I tighten the screw about half way and then I pull the fabric down until it is as taunt as I can get it and then finish tightening the screw. Your fabric is now in place and ready to embroider.

Next, trace the letter onto the fabric. I transferred the pattern in two parts, starting with the the letter itself and then after I had embroidered the letter, I transferred the curlicues.

Letter transfer all done.

Now is threading time. Since I am a little bit older now, I find that I need the use of a threader more often than not. If a beginner is doing this, I recommend using three floss strands and then tying both ends together after shredding the needle.
The more expert way way to sew is threading the six strands, then making one end shorter than the other. Tie a knot at the end of the long strands. Then as you sew, make sure you don’t sew the short end into the fabric but always keep pulling it out and making it shorter as needed.

You can start sewing any where but I decided to start here. Start the first stitch from the back of the fabric. Pull the needle and thread through.
I decided to use the stem stitch cos it works really well on curves and it is a relatively simple stitch to do. It looks fancier than a simple back stitch and has a thickness or weightiness for its simplicity that the other stitch does not have.

Next, make another make another stitch bringing the needle to the back of the fabric. Do not pull all the thread through but leave a little loop as shown above. Then bring the needle from the back, half way between the two stitches. Pull the needle through all the way.

This is what it will look like when done correctly.

Then place another stitch, about 1/4 inch from the last one, bringing the needle to the back of the fabric. Again, do not pull the needle all the way through but leave a small loop. Then bring the needle from the back, through the hole of the last stitch, where the arrow is point above. Pull the needle through all the way.
From this point on, this is the pattern you will be following. Make your stitches a little shorter when going around curves.

Pattern in process.

My L is all done.

Next step is to transfer the curlicue pattern.

I used a basic back stitch to sew the curlicue. You can create a back stitch one of two ways: do a simple running stitch covering the entire design. Then use that running stitch to go back to the starting point this time making sure you are stitching over all the areas that did not have a stitch before.
The other technique to create a backstitch is create the first 2 stitches and 3 stitch hole in a running stitch. When you pull the needle through to the front of the fabric on the third stitch hole, you will note that there is an empty spot between the 2nd stitch hole and 3rd stitch hole. You are going to insert the needle through the 2nd stitch hole to bring the needle to the back of the fabric. Then for the 5th stitch coming from the back of the fabric, bring it about 1/8 inch from stitch hole 3. Then backstitch to the the 4th stitch hole. Repeat this pattern until the curlicue is done.

To make the white flower, I used chain stitch and French Knot. Transfer your pattern onto the fabric as shown above.
Next bring the thread and needle from the back of the fabric to the center of the flower.

Then next to the 1st stitch hole, insert the needle to the back of the fabric and bring it back to the front of the fabric at one of the outer stitch points. Wrap the thread under the needle as shown above.

Pull the needle through until you see an oval like shape forming. Then place a stitch over the oval as shown above. Pull the needle and thread all the way through, making sure you pull the ovals tight but not too tight, as shown below.

Repeat the last two steps to finish the flower. I drew a flower with 8 petals but yours may have less or more.

Create a French knot to make the center of the flower. Check out this DIY for how to make French knots.

White flower all done.

I also added a “bouquet of flowers as part of my design. These are fairly easy to make. For the stems of the flowers, I used a long running stitch, placed side to side of varying lengths and more spread out at the top (where the flower buds/petals are) vs. the bottom of the stems. Then I used a French knot to create the flower buds/petals.

I finished the bouquet by sewing back and forth near the bouquet bottom to create a ribbon effect.

To create the third flower type, I started by using the stem stitch to sew in the flower stem. Then I attached a safety pin as shown above to help guide me as I do my next steps.

I threaded pink floss. I used 6 (or 3 for inexperienced sewers) strands for this as well. Start off by bringing the needle and thread from the back of the fabric right where the stem ended. OF NOTE: I did not finish the green floss becos I will need it for the finishing touch for this flower. Push the green floss to the side so that it does not get tangles with the pink floss.
Once the floss is on the right side of the fabric, insert the needle through the safety pin as shown above.

Pull the floss taunt agains the safety pin and then insert it into the fabric near the first stitch hole. Repeat this process several times until you have a layers of the pink floss. Create a knot on the back of the fabric to finish off the pink floss.

Now we are going to go back to the green floss again for the final sewing step for this flower. Bring the needle and thread to the back of the fabric. Pick a point close to the bottom of the flower and bring the needle and thread through from the fabric back. My spot was about 3/8″ from where the stem ended and the petals began. Bring the needle to the other side of the pink floss. What you are trying dot do is enclose the lower part of the pink floss entirely in the green floss. And you wanna place your stitches so that it is a tight enclosure.

Repeat that process multiple times.

Once you are done with the green floss, tie a knot on the back and cut off any excess floss. Now using a small but sharp pair of scissors, cut the pink floss in half right where it lies on the safety pin.
This flower is done. Fluff it out and even the ends.

Repeat the process to make another flower, and this time I decided I wanted a blue flower. Sew a stem stitch and attach the safety pin.

Create the loops over the safety pin.

Then finish the sewing part by enclosing the bottom of the petals in green floss.
Cut the blue floss in half by the safety pin.

And voila flowers all done. I ended by doing a pink flower (see this link for a step by step instruction) and the gold flower above the L which I made by using stem stitch and French knot.
Once done with the sewing, cut off the corners of the fabric to get a circular shape.
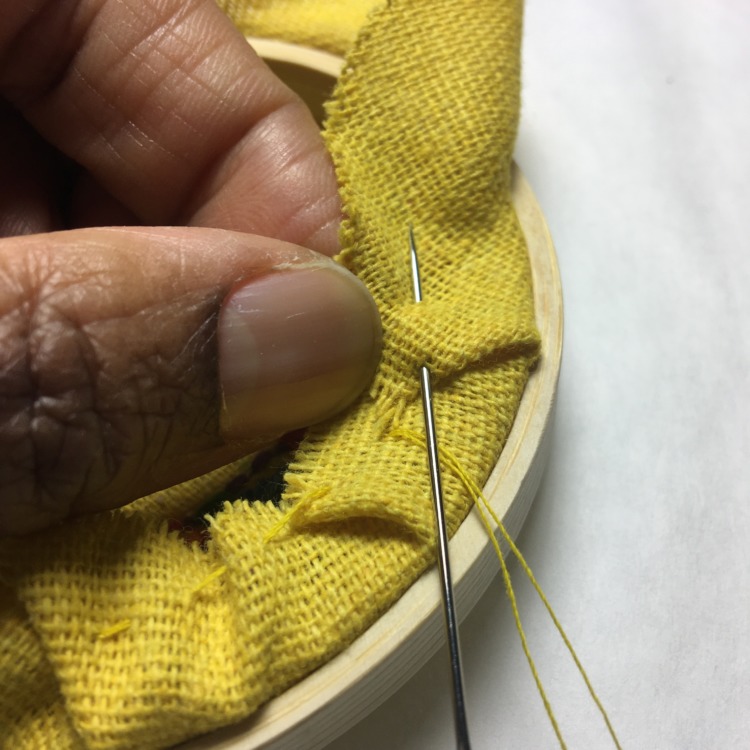
Next, use a running stitch to sew the fabric down. You will have to make many pleats along the way.
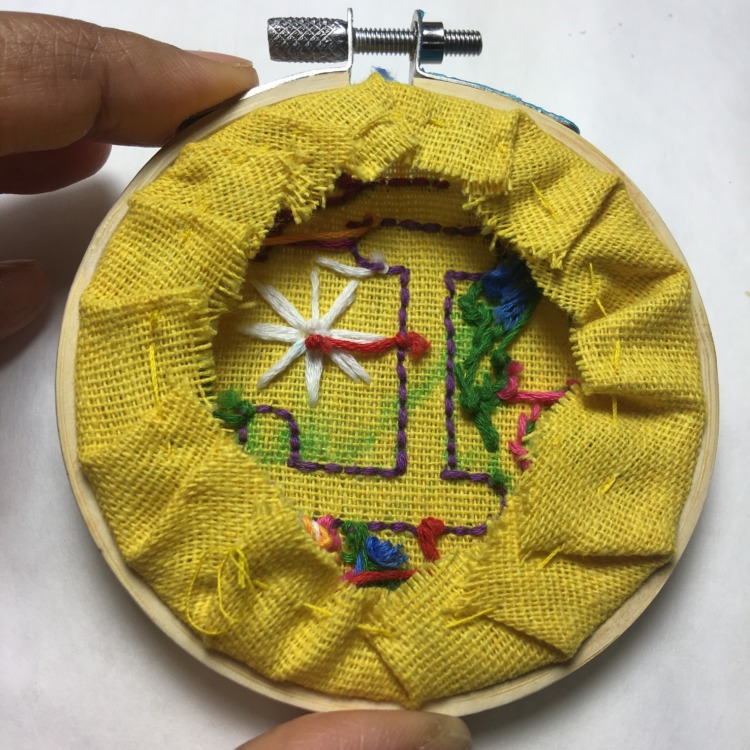
This is what it should look like when done.

Place the felt backing on top and …

Use a smple overcast stitch to secure the felt to the linen fabric.
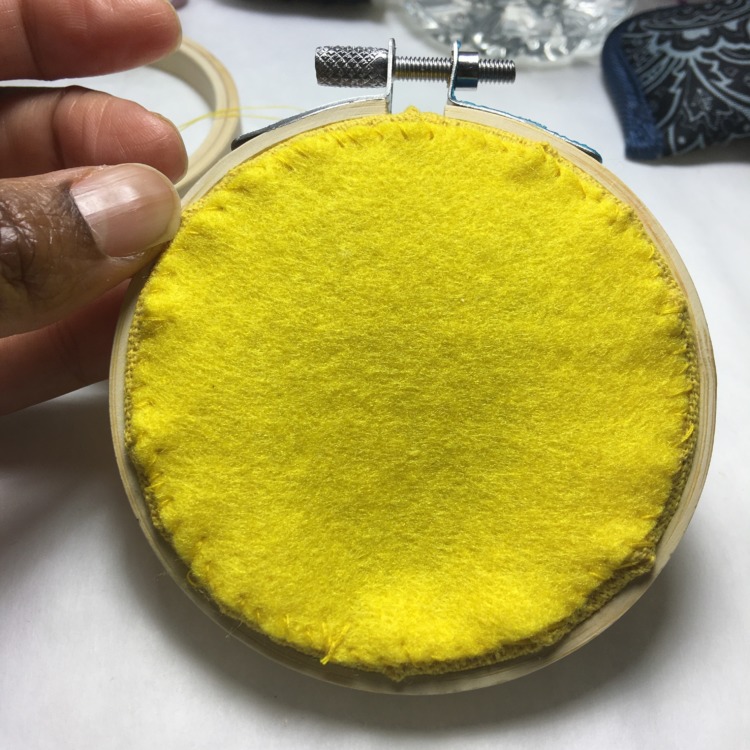
I love to hide the back of the monogram. While I do try to make my work on the back as neat and pretty as the front, sometimes, there is no way to do that and covering it is the best option.

So this is what Leila got for her birthday present. It was a total labor of love.