For my twin friends who turned 8 this year, I decided to make them a gift instead of buying them one as I did last year. Since I have been obsessed with hoop embroidery in the last coupla months, it was a no-brainer.

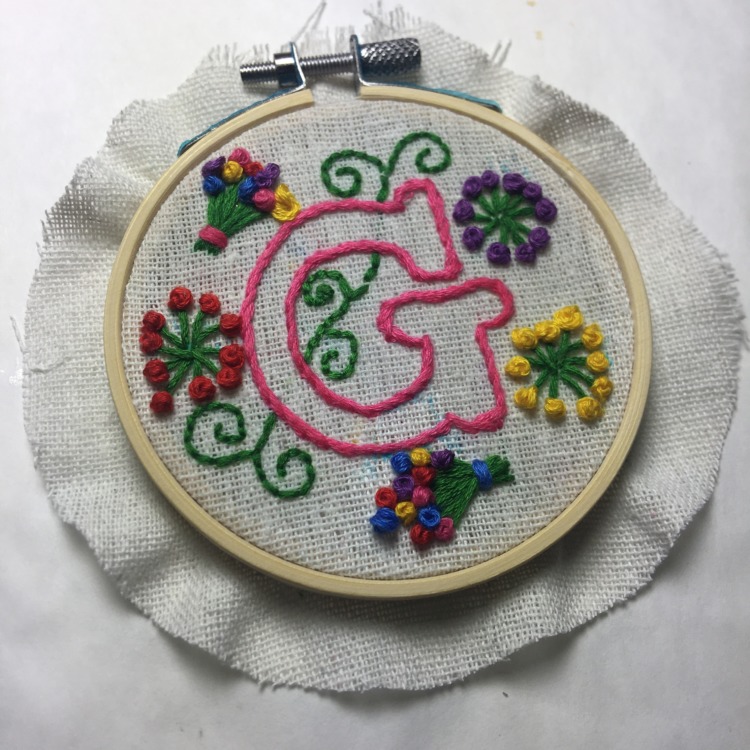
I decided that I would embroider monograms for the girls. So today I am going to present Grace’s monogram and in a few weeks, I will present Leila’s.

Supplies: 4 inch hoop, 7 inch square embroidery needlework linen, several shades of embroidery floss, embroidery needle, needle threader (optional), pair of scissors, water erasable fabric marker, stencil, felt circle cut just smaller than 4 inches (not shown)

To attach the fabric to the hoop: Loosen the screw or nut on the outer embroidery hoop and separate the inner and outer rings. The outer ring will hold the fabric over the inner ring once you have inserted the fabric.

Next, place the inner ring on a flat surface. Place your fabric over it, then put the outer ring over the fabric and press until the bottom ring is snug inside the outer ring.
Finally, tighten the nut or screw securely. To make things a little easier for me, I tighten the screw about half way and then I pull the fabric down until it is as taunt as I can get it and then finish tightening the screw. Your fabric is now in place and ready to embroider.

Next, trace the letter onto the fabric. I transferred the pattern in two parts, starting with the the letter itself and then after I had embroidered the letter, I transferred the curlicues.

Letter transfer all done.

Now is threading time. Since I am a little bit older now, I find that I need the use of a threader more often than not. I used six strands of the floss. If a beginner is doing this, I recommend using three floss strands and then tying both ends together after shredding the needle.
The more expert way way to sew is threading the six strands, then making one end shorter than the other. Tie a knot at the end of the long strands. Then as you sew, make sure you don’t sew the short end into the fabric but always keep pulling it out and making it shorter as needed.

You can start sewing any where but I decided to start here. I decided to use the stem stitch cos it works really well on curves and it is a relatively simple stitch to do. It looks fancier than a simple back stitch and has a thickness or weightiness for its simplicity that the other stitch does not have.

To do a stem stitch: Make a small stitch as shown.

Do not pull all the thread through but leave a little loop as shown above. Then bring the needle from the back, half way between the two stitches. Pull the needle through.
Then place another stitch, about 1/4 inch from the last one. Again, do not pull the needle all the way through but leave the small loop.

To bring the needle from the back of the fabric, bring it through the same hole as the second to last stitch. Pull the needle all the way through.

Continue with the process: making a small stitch about 1/4 inch from the last one but do not pull the needle all the way through to the back of the fabric. Leave a small loop. Then bring the needle from the back of the fabric through the same hole as the second to last stitch.

The stitching in process.

Letter all done.

Next step is to transfer the curlicue design to the fabric. For that design, I used what was on my original letter and then added my own twist too. This is one thing that I always recommend my students do: use my basic design and then add your own flavor to it.

Then using a basic back stitch, sew in the curlicue design.

Curlicue’s all done.

I used a half inch circle as a template for some of the flowers. I transferred the 1/8 inch stitch points onto the fabric.

All the flowers transfers done.

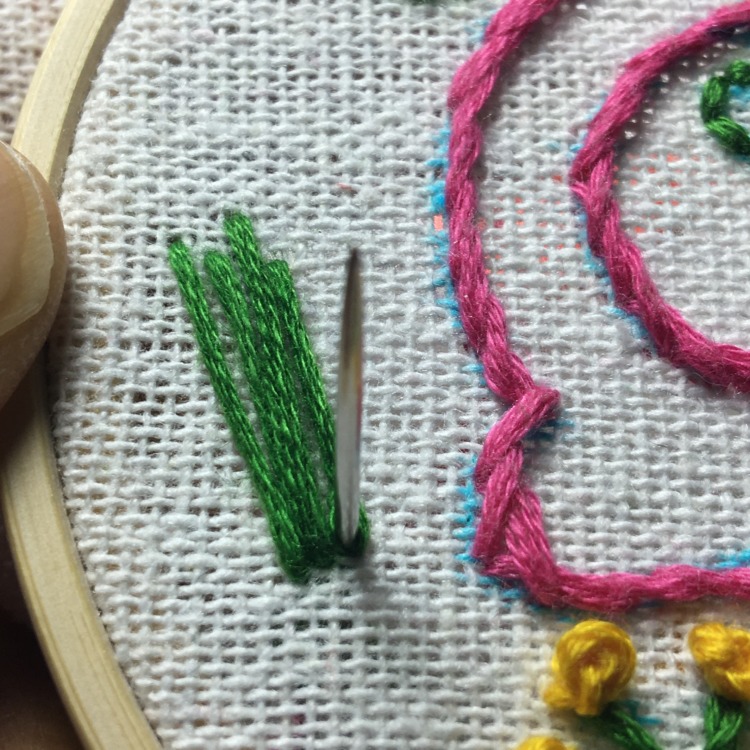
While I used a base point for my stitches for this flower: I brought the needle from the back in the center of the flower. I then stitched a basic running stitch to one of the stitch points on the circumference.
Optionally you could just do a long stitches going from one stitch point on one side of the circumference to another point that is directly opposite it. I didn’t come up with this approach until I was doing Leila’s monogram.

This is what it should look like at this point.

Then use the French knot to create the flower buds. Bring the thread from the back of the fabric at one of the tips of the just created stalks. Wrap the thread around 4 or 5 times around the needle as shown above.

Push the wrapped floss together and towards the tip of the needle. Insert the needle tip into the fabric pretty close to where it came out. While holding the long end of the thread taunt with your left hand (since I was holding the needle in my right hand), push the needle through the fabric to the back. Keep the thread in your left hand taunt. Continue to pull the thread through until a small loop is left. Let go of the thread in your left hand pull the thread all the way to the back.

Your first French knot done. Repeat the process until the flower is completed. Then do the rest of the same design flowers.
To make a bouquet of flowers, sew several long stitches at differing heights and spaced slightly apart at the top end. Picture a cone shape where it is wider by the buds of the flowers. Then use the French knot to create the buds of the flowers. I created the idea of a ribbon by running a few stitches perpendicular to the flower stalks, near the bottom and in a different color.

All done. Now to get rid of the fabric marker lines, you will have to hold the hoop under cool running water until all the marks have disappeared.
Cut the fabric corners to create a circular shape. It does not have to be precise.

Next, use a running stitch to sew the fabric down. You will have to make many pleats along the way.

Then place the felt circle to cover the back side of the monogram. Using the same color thread, edge stitch the felt to the linen fabric.

Back stitch in progress.

All done.
And Voila! Grace loved her monogram. And I truly believe that this is the best kind of gift to give. There is really no other way to show someone you care about them then by the time spent designing something like this as well as the time spent actually sewing it.